Blockchain decentralizing the financial system
11 Nov 2019Traditional vs. Decentralized Finance
The current global financial system has proved to be inefficient in multiple aspects. With so many financial intermediaries present in the system, the users face countless security risks. According to CIODIVE, cyber criminals target financial services 300 times more than other sectors. PWC analysts claim that 45% of financial intermediaries such as money transfers and stock exchanges suffer from serious cyber crimes every year.
The growing number of cyber attacks leaves the public at risk of financial loss and data exploitation. The existing financial system deprives millions of people from basic financial services because of barriers such as location, wealth, and status.
A decentralized financial system based on a public blockchain would provide access to financial services to everyone, regardless of their location and status. Numerous startups and companies have recognized the potential of open source networks to change and decentralize economic activity. Networks such as Bitcoin and Ethereum could solve the issues of the traditional financial system because of their permissionless nature. Blockchain could replace the current financial system because it is permissionless, decentralized and transparent.
Here’s what all of this means:
-
Blockchain is permissionless, which means that anyone in the world can connect to it. This kind of accessibility on a global level would solve the issue of inequality posed by the current centralized financial system.
-
Blockchain is decentralized. This means that its records are kept scattered across thousands of devices. There is no centralized server or body of authority that controls the blockchain.
-
Blockchain is completely transparent, since all transaction records are publicly auditable.
First Things First: Blockchain
With a blockchain, many people can write entries into a record of information, and a community of users can control how the record of information is amended and updated. Likewise, Wikipedia entries are not an article of a single publisher. No one person controls the information.
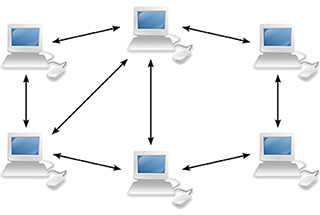
Blockchain is based on distributed ledger technology, which securely records information across a peer-to-peer network.
A distributed ledger is a database of transactions that is shared and synchronized across multiple computers and locations – without centralized control. Each party owns an identical copy of the record, which is automatically updated as soon as any additions are made. The distributed database created by blockchain technology has a fundamentally different digital backbone. This is also the most distinct and important feature of blockchain technology.
A blockchain records data across a peer-to-peer network. Every participant can see the data and verify or reject it using consensus algorithms. Approved data is entered into the ledger as a collection of “blocks” and stored in a chronological “chain” that cannot be altered.
Ethreum and the Smart Contracts
A smart contract is a set of computer code between two or more parties that run on the top of a blockchain and constitutes of a set of rules which are agreed upon by the involved parties. Upon execution, if these set of pre-defined rules are met, the smart contract executes itself to produce the output. This piece of code allows decentralized automation by facilitating, verifying, and enforcing the conditions of an underlying agreement.
The Ethereum blockchain enables more open, inclusive, and secure business networks, shared operating models, more efficient processes, reduced costs, and new products and services in banking and finance. It enables digital securities to be issued within shorter periods of time, at lower unit costs, with greater levels of customization.
- Security: Its distributed consensus based architecture eliminates single points of failure and reduces the need for data intermediaries such as transfer agents, messaging system operators and inefficient monopolistic utilities. Ethereum also enables implementation of secure application code designed to be tamper-proof against fraud and malicious third parties— making it virtually impossible to hack or manipulate.
- Transparency: It employs mutualized standards, protocols, and shared processes, acting as a single shared source of truth for network participants
- Trust: Its transparent and immutable ledger makes it easy for different parties in a business network to collaborate, manage data, and reach agreements
- Programmability: It supports the creation and execution of smart contracts— tamper proof, deterministic software that automates business logic – creating increased trust and efficiency
- Privacy: It provides market-leading tools for granular data privacy across every layer of the software stack, allowing selective sharing of data in business networks. This dramatically improves transparency, trust and efficiency while maintaining privacy and confidentiality.
- High-Performance: It’s private and hybrid networks are engineered to sustain hundreds of transactions per second and periodic surges in network activity
- Scalability: It supports interoperability between private and public chains, offering each enterprise solution the global reach, tremendous resilience, and high integrity of the mainnet
The state of the art of main Decentralized Finance projects
-
PAYMENTS
- OmiseGO Interoperability and scaling solutions for payments over Ethereum
-
STABLECOINS
-
Dai A USD-pegged stablecoin built on the Ethereum and governed by the MakerDAO system
-
Digix Physical gold with DGX tokens, where 1 DGX represents 1 gram of gold on Ethereum.
-
-
INFRASTRUCTURE
-
0x An open protocol for the peer-to-peer, decentralized exchange of digital assets
-
0xcert Open source framework for creating, managing, and swapping NFTs and tokens
-
-
EXCHANGES & LIQUIDITY
-
Bancor A decentralized liquidity network
-
Airswap Peer-to-peer trading on Ethereum
-
-
INVESTMENT
-
Meridio A platform for fractional ownership shares in real estate assets
-
Polymath Network A platform for the creation of tokenized securities
-
-
KYC & IDENTITY
-
uPort The open identity system for the decentralized web
-
Civic Secure blockchain identity toolbox and ecosystem
-
Sovrin Open source, self-sovereign identity network
-
-
DERIVATIVES
-
dYdX Open-Source Protocols for decentralized margin trading and derivatives
-
bZx (b0x) A decentralized margin lending protocol on Ethereum
-
-
MARKETPLACES
-
Gitcoin A marketplace for open source development work
-
OpenSea A peer to peer trading market for crypto collectibles and rare digital items
-
District0x A network of decentralized markets on Ethereum that operate via DAOs by utilizing Aragon
-
Ethlance A marketplace for freelance work in the Ethereum space
-
Origin A protocol for creating peer-to-peer marketplaces utilizing Ethereum and IPFS
-
-
PREDICTION MARKETS
-
Augur Prediction market protocol built on Ethereum
-
Gnosis Open platform for creating prediction market applications on the Ethereum protocol
-
Helena Prediction markets platform for forecasting blockchain developments, events, and projects
-
-
CREDIT & LENDING
-
SALT A lending and borrowing platform that allows users to leverage their crypto-assets to secure loans.
-
Dharma A suite of smart contracts and developer tools that make it possible to borrow and lend crypto-assets on blockchains like Ethereum
-
Compound Finance Open source protocol for algorithmic, efficient money markets on the Ethereum.
-
-
INSURANCE
- Etherisc A decentralized insurance protocol to collectively build risk transfer solutions
-
CUSTODIAL SERVICES
-
MetaMask A browser extension that allows users to run Ethereum dApps
-
MyEtherWallet A free, open-source, client-side interface for generating Ethereum wallets and more
-
Trust Wallet Ethereum wallet and multi cryptocurrency wallet to store your favorite ERC721 & ERC20 tokens
-
-
DE-FI DATA & ANALYTICS
-
Prediction Global Shows a list of all the markets on Augur.
-
Stablecoin Index Tracks and monitors the price, volume, and stability of stablecoins
-
Augur Leaderboard Number of trades and profits on Augur by ethereum address
-
-
DECENTRALIZED FINANCE SOLUTIONS
-
Adhara A real-time gross settlement platform providing liquidity management and international payments for decentralized financial networks
-
Kaleido An all-in-one SaaS blockchain business cloud
-
References
- forbes - The Shift Toward Decentralized Finance: Why Are Financial Firms Turning To Crypto?
- coindesk - What is Blockchain Technology?
- consensys - Blockchain in Banking and Financial Services