20 May 2026
Testing autonomous AI agents is the part of the stack that most teams underestimate. We have spent the last two years getting comfortable with prompt evaluation, golden datasets, and the occasional LLM judge. None of that is enough once the system starts planning, calling tools, and looping over its own decisions. Below is my synthesis of the best material I have read on agent evaluation recently, plus the approach that is actually working in production for Capitol Trades Tracker, the agentic AI app I run for tracking congressional stock trades.
The clearest framing comes from Comet’s piece on agent evaluation. Traditional testing assumes a single input maps to a single output. Agents do not behave that way. They branch, retry, recover, and sometimes solve the right problem the wrong way. A pass or fail on the final answer hides everything interesting about how the agent got there.
The agent evaluation deep dive makes the same point when it separates outcome evaluation from trajectory evaluation. Outcome tells you the agent finished. Trajectory tells you whether it should be trusted to finish again next time. Both matter, and they fail in different ways.
The four layers I care about
After reading through the agent evals guide, the Evaluating AI Agents manual, and the AI Evals Roadmap by Hamel Husain and friends, I keep coming back to four layers that need their own tests:
| Layer |
What it measures |
Why it matters |
| Final outcome |
Did the agent solve the task |
Easy to score, easy to game |
| Trajectory |
Which tools were called, in what order, with what arguments |
Where most real bugs live |
| Planning quality |
Is the plan coherent and well decomposed |
Catches reasoning failures before they ship |
| Runtime behavior |
Latency, cost, retries, hallucinated tool calls, silent failures |
Determines whether the agent is viable in production |
If you only test the first one, you ship an agent that passes your evals and quietly burns money in production.
Trajectory evaluation is the unlock
The single biggest shift for me was treating trajectories as the primary unit of evaluation. The agent evals guide describes this well, and the O11yBench benchmark takes it further by measuring agents on real observability workflows like log triage and incident response. The benchmark scores the path, not just the conclusion. That matches what I see when reviewing agent traces. A correct answer reached through six redundant tool calls is a failure waiting to happen at scale.
Practical version of this in code looks like trace based assertions. Capture the full execution, then write checks like:
assert trace.contains_tool_call("search_logs")
assert trace.tool_call_count("retry_query") <= 1
assert trace.total_tokens < 8000
This is closer to integration testing than unit testing. That is the point.
LLM judges are useful but not load bearing
The agent evals guide and the roadmap article both spend time on LLM as judge patterns. They work for grading open ended responses where a rubric is hard to encode. They are unreliable as the only signal. The pattern I trust is rubric scoring with a small, fixed rubric per task type, calibrated against human labels on a sample. Anything beyond that drifts.
The AlphaEval approach pushes this further by grounding evaluation in real business workflows across software engineering, finance, and operations. The lesson is that synthetic benchmarks tell you the agent can do tasks. Real workflow benchmarks tell you the agent can do your tasks.
Production is its own test environment
The Reinventing.ai piece on production testing argues that synthetic benchmarks systematically miss the failure modes that matter. I agree. Evaluation drift is real. The distribution of user requests in week six rarely matches the distribution you designed evals for in week one.
What I do in production:
- Sample a fixed percentage of live traces every day and score them with the same rubric used in CI.
- Alert on trajectory anomalies, not just error rates. A 30 percent jump in average tool calls per task is a bug, even if nothing crashes.
- Keep a small human-in-the-loop review queue for the lowest-confidence runs. The cost is low and the signal is the best you can get.
This is the same loop the Evaluating AI Agents manual recommends, and it matches what Husain calls operational evaluation in the roadmap article.
My assertive take
Most teams testing agents today are still doing prompt evals dressed up as agent evals. That is not enough. Here is what I think actually works, in order of impact:
- Trace everything from day one. If you cannot replay an agent run end to end, you cannot evaluate it. OpenTelemetry style instrumentation is non-negotiable.
- Score trajectories, not just outputs. Tool correctness, call order, retry behavior, and token budget belong in your test suite alongside final answers.
- Build a real-workflow eval set. Twenty hand-curated tasks from your actual product beat two thousand synthetic ones. AlphaEval and O11yBench are right about this.
- Run evals in CI and in production. The same rubric, the same scoring code, sampled live. Drift is the default state of any LLM system.
- Use LLM judges sparingly. Calibrate against humans, keep rubrics short, never let a judge be the only gate.
- Treat reliability as a product feature. Latency, cost, and consistency are part of correctness for an agent. A 90 percent accurate agent that costs four dollars per run is broken.
The teams shipping reliable agents are not the ones with the cleverest prompts. They are the ones who treat evaluation as engineering infrastructure, with the same seriousness they would give a database migration or a payments pipeline. That is the bar.
If you want a single starting point, read the agent evals guide for the conceptual frame, then go straight to the Evaluating AI Agents manual for the operational playbook. Everything else is variations on those two themes.
12 May 2026
awesome-react-native-skills is a curated set of Claude Skills for building production-grade React Native apps in 2026. Each skill is a self-contained folder with reference docs and conventions, so Claude can pick up the right context the moment you ask it for help on a navigation bug, a Reanimated transition, or an EAS build issue.
Why this exists
I wrote about building reusable Skills for Claude a few weeks ago. The same idea applies cleanly to React Native, maybe even more so. The ecosystem moves fast: the New Architecture is the default, Expo ships a new SDK every few months, and the “right” way to do navigation, state, or styling shifts often enough that stale answers are the norm. Packaging the current good practices as Skills means Claude loads the relevant slice on demand instead of guessing from training data.
What’s inside
Six skill groups, each focused on one part of the stack:
- React Native Core — native primitives, platform APIs, animations, gestures, accessibility.
- React Native Ecosystem — navigation, state management, data fetching, and the libraries you actually ship.
- React Native Expo — Router, EAS Build/Update/Submit, SDK upgrades.
- React Native Reusables — shadcn/ui-style components built on NativeWind v4.
- React Native Performance — profiling, measurement, and the optimizations that move the needle.
- React Native Testing — Testing Library v13/v14 patterns for unit and integration tests.
Tech the skills cover
- React Native 0.76+ with the New Architecture on by default
- Expo SDK 53 to 56
- React Navigation v7
- TanStack Query v5 for server state
- Zustand, Jotai, and Redux Toolkit for client state
- Reanimated v3 and Gesture Handler v2
- NativeWind v4 for styling
- Testing Library v13 and v14
How to use it
Drop the skills into your local Claude skills folder:
git clone https://github.com/maikotrindade/awesome-react-native-skills.git ~/.claude/skills/awesome-react-native-skills
From there, Claude’s progressive disclosure does the rest. The frontmatter of each skill stays in the system prompt, and the body loads only when your question matches. You don’t have to remember which skill to invoke.
Where it goes next
The repo is a starting point, not a finished thing. More skills are coming, and contributions are welcome if you’ve worked out a pattern that should be there. Check the project on GitHub and open an issue or PR if something’s missing or out of date.
25 Apr 2026
Android developers already fluent in Jetpack Compose will find React Native surprisingly familiar. Both share a declarative, component-driven model built around state — and if you’ve internalized the Compose mental model, the leap to React Native is much smaller than it looks from the outside.
Declarative UI: Composables vs. Components
In Jetpack Compose, you build UI by writing @Composable functions that describe what the screen should look like for a given state. React Native uses function components that do exactly the same thing. The rendering philosophy — describe, don’t impeach — is identical.
Jetpack Compose
@Composable
fun Greeting(name: String) {
    Text(text = "Hello, $name!")
}
React Native
function Greeting({ name }) {
  return <Text>Hello, {name}!</Text>;
}
Both frameworks re-run the function when inputs change and diff the result to update the UI. Compose calls this recomposition; React Native calls it re-rendering.
State Management
This is where the parallel is most striking. Compose’s remember { mutableStateOf(...) } maps almost one-to-one to React Native’s useState(). Both keep local state tied to the lifetime of the component and trigger a UI update on every change.
Jetpack Compose
@Composable
fun Counter() {
    var count by remember { mutableStateOf(0) }
    Button(onClick = { count++ }) {
        Text("Tapped $count times")
    }
}
React Native
function Counter() {
  const [count, setCount] = useState(0);
  return (
    <TouchableOpacity onPress={() => setCount(count + 1)}>
      <Text>Tapped {count} times</Text>
    </TouchableOpacity>
  );
}
The concept of state hoisting — lifting state up to the nearest common ancestor and passing it down as props — is equally central to both. Compose documentation uses the term explicitly; the React ecosystem calls it “lifting state up” and the outcome is the same pattern.
Props and Parameters
Composable function parameters are props. Both systems use the same mechanism: data flows down from parent to child, and only the parent owns the state.
Jetpack Compose
@Composable
fun UserCard(username: String, avatarUrl: String, onClick: () -> Unit) {
    // ...
}
React Native
function UserCard({ username, avatarUrl, onClick }) {
  // ...
}
Kotlin’s named arguments and default values map to React Native’s destructuring with default prop values. The ergonomics differ but the concept is the same.
Side Effects and Lifecycle
Traditional Android had a full Activity/Fragment lifecycle — onCreate, onResume, onPause, onDestroy. Compose collapsed this into LaunchedEffect and DisposableEffect. React Native takes the same simplified view via useEffect.
Jetpack Compose
// Runs on enter, cancels coroutine on leave
LaunchedEffect(userId) {
    viewModel.loadUser(userId)
}

// Runs on enter, cleanup block runs on leave
DisposableEffect(Unit) {
    val listener = registerEventListener()
    onDispose { listener.unregister() }
}
React Native
// Runs on mount and when userId changes
useEffect(() => {
  loadUser(userId);
}, [userId]);

// Cleanup runs on unmount
useEffect(() => {
  const subscription = subscribeToEvents();
  return () => subscription.remove();
}, []);
The returned cleanup function in useEffect corresponds directly to onDispose in DisposableEffect. Even the dependency array in useEffect has a Compose analogue — the key you pass to LaunchedEffect.
Navigation
If you’ve internalized Android’s back stack, React Navigation will feel natural. Pushing a screen is conceptually the same as starting an Activity with an Intent, just expressed in JavaScript.
Android (Intent with extras)
val intent = Intent(this, DetailActivity::class.java)
intent.putExtra("itemId", item.id)
startActivity(intent)
React Native (React Navigation)
navigation.navigate('Detail', { itemId: item.id });
Both maintain a stack, both support passing parameters to the destination, and both expose a back-navigation mechanism. The underlying implementation differs (system Intents vs. a JS stack), but the mental model transfers directly.
Key Differences to Keep in Mind
The similarities above are real, but a few structural differences matter:
- Language: Kotlin is statically typed with null safety built in. React Native typically uses JavaScript or TypeScript — TypeScript closes most of the gap.
- Rendering: Compose draws UI onto a canvas managed by the Android runtime. React Native (since the New Architecture, default in v0.76) uses JSI to bridge JavaScript to actual platform widgets — UIView on iOS, Android Views on Android. The output looks native because it is native.
- Tooling: Gradle, Android Studio, and
adb are replaced by npm/yarn, Metro bundler, and the React Native CLI or Expo. The ecosystem is different even if the patterns are familiar.
The Takeaway
The shift from Jetpack Compose to React Native is not a paradigm shift — it is a syntax shift with a different language underneath. Composables, state, props, effects, and the navigation stack all have direct counterparts. If you already think declaratively about UI, you’re most of the way there.
27 Mar 2026
Claude Skills let you package your workflows, domain expertise, and preferences into reusable instruction folders that Claude loads automatically when relevant. The core philosophy: stop repeating yourself and start teaching Claude once. Instead of re-explaining your processes in every conversation, a skill captures that knowledge permanently — and applies it consistently across Claude.ai, Claude Code, and the API.
What Is a Claude Skill?
A skill is a folder containing a single required file — SKILL.md — plus optional supporting directories:
scripts/ — executable Python or Bash code that runs without consuming contextreferences/ — additional documentation loaded only as neededassets/ — templates, fonts, or icons used in outputs
Skills are portable: the same skill works identically across Claude.ai, Claude Code, and the API without modification. They’re also composable — Claude can load multiple skills at once, each contributing specialized expertise without interfering with the others.
The Three-Level Progressive Disclosure Architecture
Skills use a three-level loading system designed to minimize token usage while preserving deep expertise:
- Level 1 — YAML frontmatter: Always loaded into Claude’s system prompt. Contains just enough information for Claude to decide when the skill is relevant — without pulling the full content into context.
- Level 2 — SKILL.md body: Loaded when Claude determines the skill is applicable. Contains the full workflow instructions, examples, and error handling.
- Level 3 — Linked files: Additional documents inside the skill folder that Claude navigates and reads only as needed — API guides, reference docs, or detailed examples.
This progressive approach means a skill library of dozens of entries adds minimal overhead until the right skill is needed.
Writing the SKILL.md Frontmatter
The YAML frontmatter is the most critical part of any skill — it determines whether Claude loads it at the right moment.
---
name: sprint-planner
description: Manages sprint planning workflows including task creation, velocity analysis, and capacity planning. Use when user mentions "sprint", "plan tasks", "create tickets", or "sprint planning".
---
Key rules:
name must be kebab-case, no spaces, no capitals, matches the folder namedescription must include both what the skill does and when to trigger it — include specific phrases users would actually say- Keep description under 1024 characters; no XML angle brackets (security restriction)
- Optional fields:
allowed-tools (restrict tool access), license, and metadata for author, version, and MCP server info
A vague description like "Helps with projects" will never trigger reliably. A good description names file types, trigger phrases, and the concrete outcome the skill produces.
Three Categories of Skills
Anthropic’s guide identifies three common patterns in the wild:
Document & Asset Creation — Skills that produce consistent, high-quality output: frontend designs from specs, reports following team style guides, presentations from outlines. These rely only on Claude’s built-in capabilities with no external tools needed.
Workflow Automation — Multi-step processes that benefit from consistent methodology. A sprint planning skill, for example, can fetch project status via MCP, analyze team velocity, suggest prioritization, and create tasks — all as a single guided workflow with validation gates between steps.
MCP Enhancement — If you have a working MCP server, skills add the knowledge layer on top. Without a skill, users connect your MCP but don’t know what to do next and prompt inconsistently. With a skill, best practices are embedded: pre-built workflows activate automatically, reducing support burden and improving result consistency.
Testing, Iteration, and Distribution
Effective skills testing covers three areas:
- Triggering tests — Run 10–20 queries that should activate the skill and verify it loads without explicit invocation. Target: 90% auto-trigger rate.
- Functional tests — Verify correct outputs, successful API calls, and consistent structure across repeated runs.
- Performance comparison — Compare the same task with and without the skill enabled; measure tool calls, token consumption, and user corrections required.
The fastest path to a first skill is the skill-creator skill — available in Claude.ai via the plugin directory or for Claude Code. Describe your top 2–3 workflows, and skill-creator generates a properly formatted SKILL.md with frontmatter, trigger phrases, and suggested structure. Expect 15–30 minutes to build and test your first working skill.
For distribution: host the folder on GitHub, upload it to Claude.ai via Settings > Capabilities > Skills, or deploy organization-wide through enterprise managed settings (available since December 2025). For programmatic use, the /v1/skills API endpoint enables skills in production pipelines and agent systems via the container.skills parameter on the Messages API.
Skills are published as an open standard — portable across tools and platforms by design. Explore Anthropic’s public skills repository for production-ready examples across document creation, workflow automation, and partner integrations from Asana, Figma, Sentry, Zapier, and more. The complete guide and the introductory course are the best starting points to go deeper.
18 Jan 2026
Introduction
What if you could see exactly what stocks members of Congress are buying and selling—before the market fully reacts? What if artificial intelligence could analyze these public transactions in real-time and identify patterns that might inform your investment strategy?
Welcome to Capitol Trades Tracker, a groundbreaking mobile application that combines the power of agentic AI, multiple large language models (LLMs), and public government data to democratize access to political trading intelligence.
In an era where information asymmetry creates unfair advantages, Capitol Trades Tracker levels the playing field by making publicly disclosed congressional stock transactions not just visible, but understandable through cutting-edge AI analysis.
The Problem: Public Data, Hidden Insights
Federal law requires U.S. congressional members to disclose their stock transactions. This data is public, yet it remains largely inaccessible to everyday investors. The information exists in scattered government databases, difficult to parse, and nearly impossible to analyze at scale without sophisticated tools.
Meanwhile, institutional investors and hedge funds employ teams of analysts to monitor this exact data, looking for patterns that might indicate market-moving information. This creates a significant advantage for those with resources—until now.
The Solution: AI Agents Meet Public Transparency
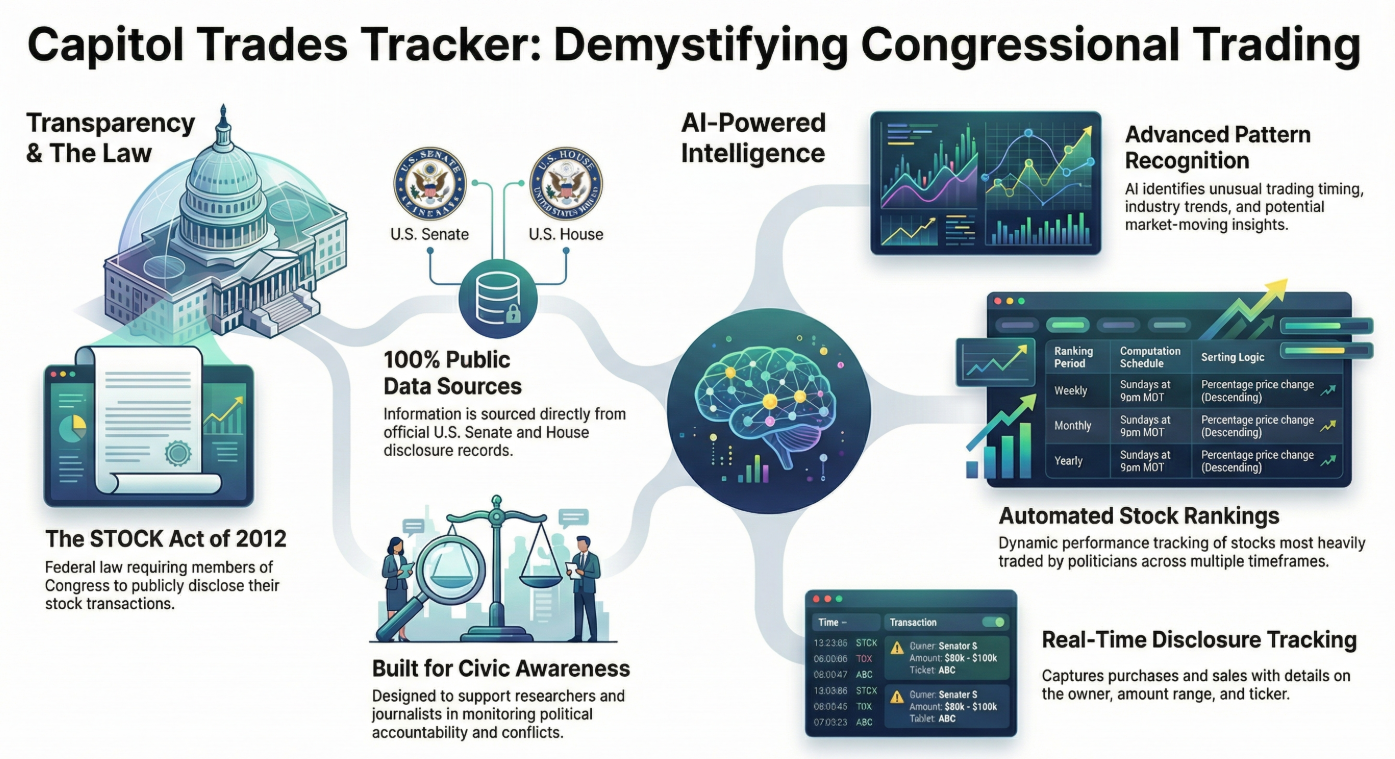
Capitol Trades Tracker bridges this gap by combining three powerful elements:
1. Comprehensive Data Aggregation
Every publicly disclosed stock transaction made by congressional members is automatically collected, normalized, and made accessible through an intuitive mobile interface. Users can see:
- Who traded (politician, office, district)
- What they traded (stock symbols, asset types)
- Transaction details (buy/sell, amount ranges, dates)
- Disclosure timing (transaction date vs. public filing date)
2. Koog-Powered AI Agents
At the heart of Capitol Trades Tracker is an intelligent AI agent built with Koog, a cutting-edge framework for developing autonomous AI agents. This isn’t just simple data retrieval—it’s sophisticated, multi-layered analysis that:
- Continuously monitors official government disclosure databases in real-time
- Processes and analyzes trading patterns using advanced algorithms
- Generates actionable insights in human-readable format
- Adapts and learns from market outcomes and political contexts
How the AI Technology Works
The Agentic Architecture
Unlike traditional applications that simply display data, Capitol Trades Tracker employs agentic AI—autonomous intelligent systems that can:
- Perceive: Monitor multiple data sources continuously, including official disclosure records, market data, and news feeds
- Reason: Apply complex analytical frameworks to identify unusual patterns, timing anomalies, and potential insider signals
- Act: Generate daily insights, flag significant trades, and deliver personalized notifications
- Learn: Improve analysis quality over time based on market outcomes
Daily Intelligence Generation
Every day, the AI agent generates fresh insights by:
- Scanning all new congressional trading disclosures
- Analyzing patterns in transaction timing, volume, and assets
- Correlating trades with pending legislation, industry trends, and market conditions
- Assessing whether trades might indicate advance knowledge
- Synthesizing findings into actionable investment intelligence
Each insight is delivered in clear markdown format with:
- Executive summary of key findings
- Detailed analysis of significant trades
- Potential investment implications
- Risk considerations
- Supporting context and reasoning
Key Features: Intelligence at Your Fingertips
📊 Trading Feed
Comprehensive, continuously updated feed of congressional stock transactions with visual indicators (green for purchases, red for sales), detailed trade information, and powerful filtering capabilities.
🤖 AI-Powered Insights Library
Complete archive of daily AI-generated analysis, showing:
- Which LLM model performed each analysis
- Date and context of the insight
- Detailed reasoning and recommendations
- Historical performance tracking
🏠 Intelligent Dashboard
Personalized home screen featuring:
- Latest AI insight with key takeaways
- Most recent congressional transaction
- Relevant news and market updates
- Quick access to all features
👤 Secure Profile Management
Google account integration for secure authentication, preference management, and personalized notifications.
📱 Mobile-First Design
Beautiful, responsive Android app built with modern Material Design, ensuring intuitive navigation and smooth performance.
Who Benefits: Democratizing Investment Intelligence
📈 Individual Investors
Gain the same insights that institutional investors pay millions for. Make informed decisions based on what politicians are actually doing with their money.
🎓 Researchers & Academics
Access comprehensive historical data and AI analysis to study political trading patterns, market behavior, and governmental transparency.
💼 Financial Advisors
Stay ahead of market-moving political activities to better serve clients with timely, data-driven advice.
🔍 Transparency Advocates
Monitor political accountability and potential conflicts of interest through accessible, AI-enhanced public data.
Real-World Impact: The Power of Transparency + AI
Capitol Trades Tracker represents a fundamental shift in how public data can serve public good:
Leveling the Playing Field: What was once exclusive intelligence for well-resourced institutions is now available to anyone with a smartphone.
Promoting Accountability: By making political trading patterns visible and understandable, we encourage greater scrutiny and responsibility.
Enabling Better Decisions: AI-powered analysis transforms raw data into actionable intelligence, helping users understand not just what happened, but why it matters.
Advancing Transparency: Making public data truly accessible furthers democratic ideals and informed citizenship.
The Future: Expanding AI-Powered Transparency
This is just the beginning. Future enhancements include:
- Predictive analytics using advanced machine learning
- Portfolio tracking to compare your holdings against congressional trades
- Custom alerts for specific politicians or sectors
- Expanded coverage to state-level officials
- Community insights where users can share analysis
- API access for developers and researchers
Conclusion: AI for Good, Intelligence for All
Capitol Trades Tracker demonstrates how cutting-edge AI technology can serve the public interest. By combining Koog’s agentic AI framework with multiple large language models and publicly available data, we’ve created a tool that:
- Makes government more transparent
- Empowers individual investors
- Advances democratic accountability
- Leverages AI for social good
This isn’t about creating unfair advantages—it’s about eliminating them. It’s about using the most advanced AI technology to ensure that public information serves the public, not just those with resources to analyze it.
The data is public. The AI is powerful. The insights are yours.
