28 Jun 2021
Chainlink
Chainlink is a decentralized network of nodes that provide data and
information from off-blockchain sources to on-blockchain smart
contracts via oracles
Chainlink greatly expands the capabilities of smart contracts by enabling access to real-world data and off-chain computation while maintaining the security and reliability guarantees inherent to blockchain technology.
This tutorial will be based on this repo and we will use Truffle – a development environment, testing framework and asset pipeline for Ethereum
Prerequisite
1. Install NodeJS
2. Install Truffle: npm install -g truffle
3. Install Metamask
4. Install Ganache
5. Install VSCode
6. Install Solidity Plugin
Hands on: Truffle + Chainlink
npm install --global yarn
mkdir Chainlink
cd Chainlink
truffle unbox smartcontractkit/box
yarn
Running tests
Run Ganache or enable/integrate
Kovan testnet
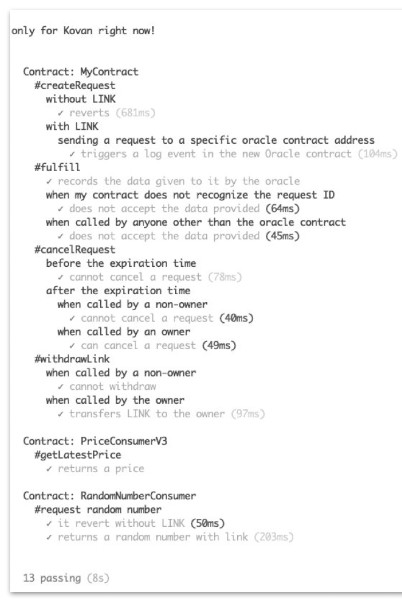
npm test
All tests of /test will be executed.
There are tests about creating requests with and without Link tokens, sending these requests to oracle contract addresses, and testing contract ownership.

Note
You must acquire some LINK for interact with you smart contract.
Get some LINK via Chainlink Kovan Faucet website 🤑 🤑 🤑
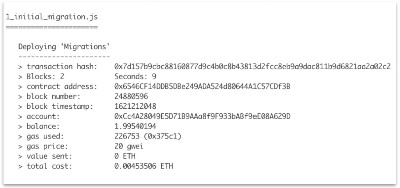
Ganache deployment
truffle migrate --network ganache --reset
Kovan deployment
- Setup Metamask and connect to Kovan network
- Faucet: faucet.kovan.network
- Create account and a project using Infura.io – step-by-step tutorial
- Infura setup and “env.sample” file configuration
truffle migrate --network kovan --reset

Helper scripts
Scripts to interact with deployed smart contract without any frontend implementation:
- fund-contract.js
npx truffle exec scripts/fund-contract.js --network kovan
- request-data.js
npx truffle exec scripts/request-data.js --network kovan
- read-contract.js
npx truffle exec scripts/read-contract.js --network kovan
● fund-contract.js
➢ Send 1 LINK to requesting contract
● request-data.js
➢ Chainlink request to be created from the requesting contract
● read-contract.js
➢ Read the data variable of the requesting contract (current price of pair ETH/USD)
Chainlink docs
Chainlink official website
Truffle Starter kit impl
Code a REAL WORLD dApp with Chainlink - Ethereum, Solidity, Web3.js
What Is Chainlink in 5 Minutes
12 Jun 2021
Why
Blockchain’s inability to fetch reliable information from the real world
● Huge vulnerability in decentralized applications when Blockchain wants to take advantage of off-chain data
● Origins of data are also the points where data can be manipulated, compromised, or simply falsified
● Chainlink started on Ethereum but it’s also available on Polkadot, Hyperledger, etc…
Chainlink
Decentralized network of nodes that provide data and information from off-blockchain sources to on-blockchain smart contracts via oracles.
LINK is built on Ethereum in accordance with the ERC-20 standard for tokens
❏ Sep 2017 – Chainlink raises $32 million in an ICO creating 1 billion LINK tokens
❏ Nov 2018 – Chainlink acquires TownCrier
❏ May 2019 – Chainlink is launched on Ethereum mainnet
❏ May 2021 – Chainlink 2.0 whitepaper
The Chainlink’s oracle
Oracle – Middleware that acts as an intermediary, translating data from the real world to smart contracts on the blockchain and back again
Chainlink – Decentralized network of nodes that provide data and information from off-blockchain sources to on-blockchain smart contracts via oracles
🥇 Market standard for decentralized oracles
✅ Enhance and extend the capabilities of smart contracts on a target
blockchain through functions that are not available natively
✅ To minimize the potential failure of oracles: Distribution of data sources,
Distribution of oracles and Use of trusted hardware
✅ The Chainlink Reputation Contract
Chainlink 2.0
Chainlink 2.0: Next Steps in the Evolution of Decentralized Oracle Networks
Oracle networks go far beyond delivering highly validated data, they provide the various decentralized
services that are combined with smart contracts to create real world outcomes. These hybrid smart
contracts are already redefining our industry as DeFi.
🔥 Hybrid Smart Contracts that are seamlessly connected to all necessary off-chain resources, while
retaining increased levels of privacy and being secured
🔥 New “architecture” enables more advanced off-chain computation
🔥 Increase number of services since ecosystem is more flexible and enhance its capabilities. Chainlink
is the future of DeFi
Glossary
ERC-20: technical standard used to issue and implement tokens on the Ethereum blockchain. It makes
easier for developers to predict with more accuracy the interaction between different tokens and
applications
Faucet: website that distributes small amounts of crypto
ICO: An Initial coin offering occurs when company looking to raise money to create a new coin, app, or
service launches an ICO as a way to raise funds. Similar to an IPO
Middleware: software that acts as a bridge between an operating system or database and applications,
especially on a network
Off-chain: Transactions which agree to happen outside the blockchain
On-chain: normally refer to as blockchain transactions which happens inside the blockchain
Top Oracles Tokens by Market Capitalization
77 Smart Contract Use Cases Enabled By Chainlink
Expanding Beyond Data Delivery With Chainlink 2.0
29 Sep 2020
Intro
Solidity supports multiple inheritance including polymorphism. Inheritance is the process of defining multiple contracts that are related to each other through parent-child relationships. The contract that is inherited is called the parent contract and the contract that inherits is called the child contract.
When a contract inherits from other contracts, only a single contract is created on the blockchain, and the code from all the base contracts is compiled into the created contract. This means that all internal calls to functions of base contracts also just use internal function calls.
The benefits of using inheritance are: Ability to change one contract and have those modifications reflected in others, Reducement of dependency nad Ability to reuse existing code more.
Example of Inheritance
pragma solidity ^0.8.0;

contract Grandparent {
    function myFunction() public pure virtual returns (string memory) {
        return "Contract Grandparent";
    }
}

// Contracts inherit other contracts by using the keyword 'is'.
contract Parent is Grandparent {
    // Override Grandparent.myFunction()
    function myFunction() public pure virtual override returns (string memory) {
        return "Contract Parent";
    }
}

contract Uncle is Grandparent {
    // Override Grandparent.myFunction()
    function myFunction() public pure virtual override returns (string memory) {
        return "Contract Uncle";
    }
}
Note: Solidity copies the base contracts into the derived contract and a single contract is created with inheritance. A single address is generated that is shared between contracts in a parent-child relationship.
💡 Gotchas
- In the case of multiple inheritances, function calls using super gives preference to most derived contracts;
- There are different types of inheritances: Single, Multi-level, Multiple and Hierarchical;
- A derived contract can access all non-private members including state variables and internal methods. But using this is not allowed;
- We can call a super contract’s function using a
super keyword or using a super contract name;
Inheritance in Solidity – Solidity docs
14 Jul 2020
Mappings are one of the most used complex data types in Solidity. Mappings act as hash tables which consist of key types and corresponding value type pairs – pretty similar to hash tables or dictionaries in other languages. They help in storing key-value pairs and enable retrieving values based on the supplied key.
Mappings are declared using the mapping keyword followed by data types for both key and value separated by the => notation. Mappings have identifiers like any other data type and they can be used to access the mapping and can only have type of storage and are generally used for state variables. Solidity automatically creates a getter function for it.
Although it is similar to a hash table and dictionary, Solidity does not allow iterating through mapping. A value from mapping can be retrieved if the key is known. The next example illustrates working with mapping.
Another characteristic about mapping is the absence of iteration support but there are ways to work round this limitation. Notice that iterating and looping are an expensive operation in Ethereum in terms of gas usage and should generally be avoided.
💡 Gotchas
- Mappings do not have a length, nor do they have a concept of a key or a value being set
- It is also possible to have nested mapping, that is mapping consisting of mappings
- Mappings can only be used for state variables that act as storage reference types
- Mapping cannot be declared within functions as memory mappings
- When mappings are initialized every possible key exists in the mappings and are mapped to values whose byte-representations are all zeros
Types in Solidity – Solidity Docs v0.4.21
01 May 2020
Smart contracts are the basic unit of deployment and execution for EVMs. A contract contains state variables, functions, function modifiers, events, structures, and enums. Contracts also support inheritance. Inheritance is implemented by copying code at the time of compiling. Smart contracts also support polymorphism.
Every transaction on Ethereum Virtual Machine costs us some amount of Gas. The lower the Gas consumption the better is your Solidity code. The Gas consumption of Memory is not very significant as compared to the gas consumption of Storage. Therefore, it is always better to use Memory for intermediate calculations and store the final result in Storage.
State variables
The variable can be used at multiple places within code and they will all refer to the value stored within it. Solidity provides two types of variable: state and memory.
The default for function parameters (including return parameters of functions) is memory, the default for local variables is storage.
Storage
Persistent data is referred to as storage and is represented by state variables. These values get stored permanently on the blockchain. You need to declare the type so that the contract can keep track of how much storage on the blockchain it needs when it compiles.
Structure
Structures or structs helps implement custom user-defined data types. A structure is a composite data type, consisting of multiple variables of different data types. They are very similar to contracts; however, they do not contain any code within them. They consist of only variables.
ANATOMY OF SMART CONTRACTS by Ethereum.org


