20 Feb 2020
Kotlin Coroutines in an Android app—a new way of managing background threads that can simplify code by reducing the need for callbacks. Coroutines are a Kotlin feature that converts async callbacks into sequential code. Code written sequentially is typically easier to read, and can even use language features such as exceptions.
In the end, they do the exact same thing: wait until a result is available from a long-running task and continue execution. However, in code they look very different.
The keyword suspend is Kotlin’s way of marking a function, or function type, available to coroutines. When a coroutine calls a function marked suspend, instead of blocking until that function returns like a normal function call, it suspends execution until the result is ready then it resumes where it left off with the result. While it’s suspended waiting for a result, it unblocks the thread that it’s running on so other functions or coroutines can run.
Note
The pattern of async and await in other languages is based on coroutines. If you're familiar with this pattern, the suspend keyword is similar to async. However in Kotlin, await() is implicit when calling a suspend function.
Scopes
All coroutines run inside a CoroutineScope. A scope controls the lifetime of coroutines through its job. When you cancel the job of a scope, it cancels all coroutines started in that scope. On Android, you can use a scope to cancel all running coroutines when, for example, the user navigates away from an Activity. Scopes also allow you to specify a default dispatcher. A dispatcher controls which thread runs a coroutine.
GlobalScope - Lifetime of the new coroutine is limited only by the lifetime of the whole application
CoroutineScope - Is destroyed after all launched children are completed
MainScope - Scope for UI applications and uses Dispatchers.Main
Note
Libraries like Room and Retrofit offer main-safety out of the box when using coroutines, so you don't need to manage threads to make network or database calls. This can often lead to substantially simpler code.
Channels
Channels are a way to communicate (transfer data) between coroutines similar to a blocking queue.
It Uses send and receive for normal values, produce and consume for streams. Moreover, Channels can be closed to indicate no more elements are coming.
Exception handling
Coroutines will delegate uncaught exceptions to the system’s uncaught exception handler. On Android, the handler will output the exception and crash the app.
try {
    GlobalScope.launch {
        throw NullPointerException()
    }
} catch (e: Exception) {
    // Exceptions will never land here because `launch` propagates uncaught exceptions
    // to the default handler and will never pass them to the outer scope.
    System.err.println("Caught exception! $e")
}
Use Kotlin Coroutines in your Android App by Google
Android Kotlin Fundamentals 06.2: Coroutines and Room by Google
Understand Kotlin Coroutines on Android at Google/IO 19
05 Dec 2019
Intro
Kotlin, as a language, provides only minimal low-level APIs in its standard library to enable various other libraries to utilize coroutines. Unlike many other languages with similar capabilities, async and await are not keywords in Kotlin and are not even part of its standard library. Moreover, Kotlin’s concept of suspending function provides a safer and less error-prone abstraction for asynchronous operations than futures and promises.
On Android, coroutines help to solve two primary problems:
- Manage long-running tasks that might otherwise block the main thread and cause your app to freeze.
- Providing main-safety, or safely calling network or disk operations from the main thread.
Get Started
Essentially, coroutines are light-weight threads. They are launched with launch coroutine builder in a context of some CoroutineScope. Here we are launching a new coroutine in the GlobalScope, meaning that the lifetime of the new coroutine is limited only by the lifetime of the whole application.
See this example:
import kotlinx.coroutines.*

fun main() {
    GlobalScope.launch { // launch a new coroutine
	delay(1000L) // non-blocking delay
	println("World!")
}

	println("Hello,") // main thread continues
	Thread.sleep(2000L) // block main thread
}
Coroutines allows us to mix blocking and non-blocking code in the same place. See the following example which has two delays. The first one is a non-blocking code inside a courotine and the second is blocking. Both work correctly once they are wrapped bt another courotine.
Note: Delaying for a time while another coroutine is working is not a good approach.
import kotlinx.coroutines.*

fun main() = runBlocking<Unit> { // start main coroutine
	GlobalScope.launch { // launch a new coroutine
	delay(1000L)
	println("World!")
}

	println("Hello,") // main coroutine continues
	delay(2000L)      // delaying
}
Designate a CoroutineScope
When defining a coroutine, you must also designate its coroutineScope. A coroutineScope manages one or more related coroutines. You can also use a coroutineScope to start a new coroutine within that scope. Unlike a dispatcher, however, a coroutineScope doesn’t run the coroutines.
One important function of coroutineScope is stopping coroutine execution when a user leaves a content area within your app. Using coroutineScope, you can ensure that any running operations stop correctly.
runBlocking and coroutineScope may look similar because they both wait for its body and all its children to complete. The main difference between these two is that the runBlocking method blocks the current thread for waiting, while coroutineScope just suspends, releasing the underlying thread for other usages. Because of that difference, runBlocking is a regular function and coroutineScope is a suspending function.
11 Nov 2019
Traditional vs. Decentralized Finance
The current global financial system has proved to be inefficient in multiple aspects. With so many financial intermediaries present in the system, the users face countless security risks. According to CIODIVE, cyber criminals target financial services 300 times more than other sectors. PWC analysts claim that 45% of financial intermediaries such as money transfers and stock exchanges suffer from serious cyber crimes every year.
The growing number of cyber attacks leaves the public at risk of financial loss and data exploitation. The existing financial system deprives millions of people from basic financial services because of barriers such as location, wealth, and status.
A decentralized financial system based on a public blockchain would provide access to financial services to everyone, regardless of their location and status. Numerous startups and companies have recognized the potential of open source networks to change and decentralize economic activity. Networks such as Bitcoin and Ethereum could solve the issues of the traditional financial system because of their permissionless nature. Blockchain could replace the current financial system because it is permissionless, decentralized and transparent.
Here’s what all of this means:
-
Blockchain is permissionless, which means that anyone in the world can connect to it. This kind of accessibility on a global level would solve the issue of inequality posed by the current centralized financial system.
-
Blockchain is decentralized. This means that its records are kept scattered across thousands of devices. There is no centralized server or body of authority that controls the blockchain.
-
Blockchain is completely transparent, since all transaction records are publicly auditable.
First Things First: Blockchain
With a blockchain, many people can write entries into a record of information, and a community of users can control how the record of information is amended and updated. Likewise, Wikipedia entries are not an article of a single publisher. No one person controls the information.
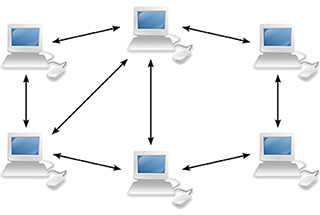
Blockchain is based on distributed ledger technology, which securely records information across a peer-to-peer network.
A distributed ledger is a database of transactions that is shared and synchronized across multiple computers and locations – without centralized control. Each party owns an identical copy of the record, which is automatically updated as soon as any additions are made. The distributed database created by blockchain technology has a fundamentally different digital backbone. This is also the most distinct and important feature of blockchain technology.
A blockchain records data across a peer-to-peer network. Every participant can see the data and verify or reject it using consensus algorithms. Approved data is entered into the ledger as a collection of “blocks” and stored in a chronological “chain” that cannot be altered.

Ethreum and the Smart Contracts
A smart contract is a set of computer code between two or more parties that run on the top of a blockchain and constitutes of a set of rules which are agreed upon by the involved parties. Upon execution, if these set of pre-defined rules are met, the smart contract executes itself to produce the output. This piece of code allows decentralized automation by facilitating, verifying, and enforcing the conditions of an underlying agreement.
The Ethereum blockchain enables more open, inclusive, and secure business networks, shared operating models, more efficient processes, reduced costs, and new products and services in banking and finance. It enables digital securities to be issued within shorter periods of time, at lower unit costs, with greater levels of customization.
- Security: Its distributed consensus based architecture eliminates single points of failure and reduces the need for data intermediaries such as transfer agents, messaging system operators and inefficient monopolistic utilities. Ethereum also enables implementation of secure application code designed to be tamper-proof against fraud and malicious third parties— making it virtually impossible to hack or manipulate.
- Transparency: It employs mutualized standards, protocols, and shared processes, acting as a single shared source of truth for network participants
- Trust: Its transparent and immutable ledger makes it easy for different parties in a business network to collaborate, manage data, and reach agreements
- Programmability: It supports the creation and execution of smart contracts— tamper proof, deterministic software that automates business logic – creating increased trust and efficiency
- Privacy: It provides market-leading tools for granular data privacy across every layer of the software stack, allowing selective sharing of data in business networks. This dramatically improves transparency, trust and efficiency while maintaining privacy and confidentiality.
- High-Performance: It’s private and hybrid networks are engineered to sustain hundreds of transactions per second and periodic surges in network activity
- Scalability: It supports interoperability between private and public chains, offering each enterprise solution the global reach, tremendous resilience, and high integrity of the mainnet
The state of the art of main Decentralized Finance projects
References
- forbes - The Shift Toward Decentralized Finance: Why Are Financial Firms Turning To Crypto?
- coindesk - What is Blockchain Technology?
- consensys - Blockchain in Banking and Financial Services
09 Jul 2019
Intro
Koin is a lightweight dependency injection library for Kotlin and written in pure Kotlin. using functional resolution only: no proxy, no code generation, no reflection. Koin is a DSL, using Kotlin’s DSLs, that describes your dependencies into modules and sub-modules. You describe your definitions with certain key functions that mean something in the Koin context.

In this article, we are going to pass through the basic steps to setup and take advantage of dependency injection with Koin for a simple project.
1. Setup
// Add Jcenter to your repositories if needed
repositories {
    jcenter()
}
dependencies {
    // Koin for Android
    implementation 'org.koin:koin-android:{revnumber}'
}
2. Declare a module
Defines those entities which will be injected in the app.
val appModule = module {
	single { DataRepository }
}
3. Use Application layer to initialize Koin injection
Trigger the DI process and indicate which modules will be available when needed
class BaseApplication : Application() {

  override fun onCreate() {
    super.onCreate()
    startKoin(this, appModule)
  }

}
4. Use the actual injection
class MainActivity : AppCompatActivity() {
  private val repository: DataRepository by inject()
  ...
}
This was the basic usage of koin which has much more power/features available in its framework. Another great Koin feature is the integration with the Architecture Component View Model. Koin has a specif project called koin-android-viewmodel project is dedicated to inject Android Architecture ViewModel.
Architecture Components with Koin: ViewModel
1. Setup
// Add Jcenter to your repositories if needed
repositories {
    jcenter()
}
dependencies {
    // ViewModel for Android
    implementation 'org.koin:koin-android-viewmodel:{revnumber}'
    // or ViewModel for AndroidX
    implementation 'org.koin:koin-androidx-viewmodel:{revnumber}'
}
2. Declare a module for your viewModule
val appModule = module {
    // ViewModel for News View with a dependency in its constructor
    viewModel { NewsViewModel(get()) }
}
3. Use the actual injection
class MainActivity() : AppCompatActivity() {

  // lazy inject MyViewModel
  val viewModel : NewsViewModel by viewModel()
}
Koin Key Functions
module { } - create a Koin Module or a submodule (inside a module)factory { } - provide a factory bean definitionsingle { } - provide a bean definitionget() - resolve a component dependencybind - additional Kotlin type binding for given bean definitiongetProperty() - resolve a property
Futher Details
I highly recommend the official docs and the following articles: Koin - Simple Android DI and Ready for Koin 2.0 by Arnaud Giuliani
03 May 2019
Introduction
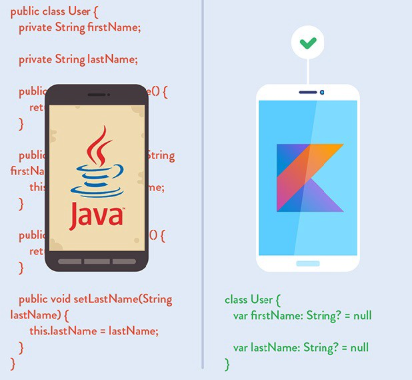
Google announced official support for the Kotlin language at Google I/O 2017. Many developers started migrating the code base away from Java and learning Kotlin on the way. We are going to discuss how you can go from Java to Kotlin and also talk about some tips about this process.
Getting started
The very easy/initial thing you could do: use the Android Studio IDE to starting the convertion:
In the IDE, go to Android Studio -> Code -> Convert Java File to Kotlin File:
The converter is really nice, it is smart and does the most of job gracefully. However during the automated process the converter would choose not the most appropriate choice, so you must look into the code and figure out if the converter was right in all the scenarios. Probably the most interesting issue you may face is the nullability, because by default, all the converted object will be non-nullable and you will have to explicitly specified them to be nullable or change your logic. Another issue is about usage of android-annontations will most likely break. There is a shortcut to access the converter: CMD+SHFT+ALT+K or CTRL+SHIFT+ALT+K depending of your operational system.
Another option of converting the code is using the online tool try.kotlinlang. Access the URL https://try.kotlinlang.org and click on “Convert from Java”. In this way you can convert your project graduallly and observe all the changes clearly.

Things to keep in mind
Interoperability – Java and Kotlin work perfectly together. So don’t be afraid to add Kotlin code step by step, it’s not necessary to migrate all code to another language.
Pitfalls – Automatic conversions can also be dangerous to your project, there are some scenarios that you may face new bugs in your code, for example an unexpected nullability. Some code converted can be asserted as not null which in turn can lead to a NullPointerException.
Usage of val and lateinit – the misusage of these can cause problems to your actual project. val is like Java final variable and it’s known as immutable in kotlin and can be initialized only single time. A misusage of this field is setting a variable would be changed somehow, for example, a variable inside your model which will be used in a parcelable or as response of networki request. Make the property nullable if it makes better sense and improves null safety. lateinit might be good if used properly but it has its cons as well. Don’t make it a replacement for NullPointerException.
Google Codelab “Refactoring to Kotlin”
Google offers a Codelab specifically for refactoring Java code to Kotlin. Besides this course provides a very interesting channel to learn more about Koltin, its features and concepts, this is the list of what you will learn in the codelab:
- Handling nullability
- Implementing singletons
- Data classes
- Handling strings
- Elvis operator
- Destructuring
- Properties and backing properties
- Default arguments and named parameters
- Working with collections
- Extension functions
- Top-level functions and parameters
- let, apply, with, and run keywords
Check the codelab versions in Chinese and Brazilian Portuguese.


